Monday, 26 June 2017

Updrade MySQL server version on Windows

How to upgrade MySQL server on Windows? In my case, I am upgrading MySQL 5.5 to 5.7

1) Go to here : https://dev.mysql.com/downloads/mysql/ and Download it from here : https://prnt.sc/fo9zax

2) Extract it at any temp location on your PC (for ex, D:\mysql)

3) Copy "data" folder from your old installation, which should be here, "C:\Program Files\MySQL\MySQL Server 5.5\data"

4) Paste "data" folder inside extracted folder in step 2. (i.e. "D:\mysql\mysql-5.7.18-winx64")

5) Stop existing MySQL service. 

6) Create new folder based on your new version inside "C:\Program Files\MySQL\". (i.e. MySQL Server 5.7)

7) Copy all files/folders from "D:\mysql\mysql-5.7.18-winx64" to "C:\Program Files\MySQL\MySQL Server 5.7"

8) Install the server as service using below command
--> "C:\Program Files\MySQL\MySQL Server 5.7\bin\mysqld" --install MySQL57

9) Change your environment variable PATH as per the latest folder.

10) Start the service with latest version using below command or using the Windows Task Manager
--> NET START MySQL57

11) Change the root user password with following commands
--> mysql -u root
--> use mysql;
--> update user set password=PASSWORD("mynewpassword") where User='root';
--> flush privileges;
--> exit;

12) Upgrade the mysql using below command
--> mysql_upgrade -u root -p
Enter your password which you set in setp no 10.
This should give you output like this, https://prnt.sc/fo9prk

13) You are done!
References

Wednesday, 8 February 2017

How to enable ImageMagick with Alfresco 5.1 on Windows?


1. Open {alfresco_installation_dir}\tomcat\bin\setenv.bat
2. Comment the by default magicbox settings by adding rem at the start of line. You will find default setting after this line rem ##### IMAGEMAGICK ENV #####
3. Add below lines
setx PATH "{alfresco_installation_dir}\imagemagick\bin;{alfresco_installation_dir}\imagemagick;{alfresco_installation_dir}\java\bin;%PATH%"
setx MAGICK_HOME "{alfresco_installation_dir}\imagemagick"
setx MAGICK_CODER_MODULE_PATH "{alfresco_installation_dir}\imagemagick\modules\coders"
setx MAGICK_CONFIGURE_PATH "{alfresco_installation_dir}\imagemagick"

Just restart alfresco and it's DONE.

Sunday, 9 August 2015

Java 8 Functional Interfaces Overview

Note that every functional interface can have at most one abstract method effectively.

➤ 1. Function : Transformation : Takes some input and produce some output

   ➤ 1.1. Function<T,R> : Takes one generic input (T) and produce generic output (R).

      ➤ Input Type : T
      ➤ Output Type : R
      ➤ Method Signature : R apply(T t)
   
      ➤ 1.1.A. UnaryOperator<T> : Takes one generic input (T) and produce same type of output (T).
      
         ➤ Extends : UnaryOperator<T> extends Function<T,T>
         ➤ Input Type : T
         ➤ Output Type : T
         ➤ Method Signature : T apply(T t)
         
         
         ➤ 1.1.A.1. UnaryOperator variants for primitive tyeps : Takes one primitive input and produce same type of primitive output.
         
            ➤ Input Type : primitive
            ➤ Output Type : primitive
            ➤ Method Signature : <<primitive>> <<methodName>>(<<primitive>> value)
         
            ➤ 1.1.A.1.1. IntUnaryOperator : Takes one int (primitive) input and produce int (primitive) output.
            
               ➤ Input Type : int (primitive)
               ➤ Output Type : int (primitive)
               ➤ Method Signature : int applyAsInt(int value)

            ➤ 1.1.A.1.2. LongUnaryOperator : Takes one long (primitive) input and produce long (primitive) output.
            
               ➤ Input Type : long (primitive)
               ➤ Output Type : long (primitive)
               ➤ Method Signature : long applyAsLong(long value)

            ➤ 1.1.A.1.3. DoubleUnaryOperator : Takes one double (primitive) input and produce double (primitive) output.
            
               ➤ Input Type : double (primitive)
               ➤ Output Type : double (primitive)
               ➤ Method Signature : double applyAsDouble(double value)
      

      ➤ 1.1.1. Primitive Input Functions : Takes one primitive input and produce generic output(R).
      
         ➤ Input Type : primitive
         ➤ Output Type : R
         ➤ Method Signature : R apply(<<primitive>> value)
         
         ➤ 1.1.1.1. IntFunction<R> : Takes one int (primitive) input and produce generic output(R).
         
            ➤ Input Type : int (primitive)
            ➤ Output Type : R
            ➤ Method Signature : R apply(int value)
         
         ➤ 1.1.1.2. LongFunction<R> : Takes one long (primitive) input and produce generic output(R).
         
            ➤ Input Type : long (primitive)
            ➤ Output Type : R
            ➤ Method Signature : R apply(long value)
            
         ➤ 1.1.1.3. DoubleFunction<R> : Takes one double (primitive) input and produce generic output(R).
         
            ➤ Input Type : double (primitive)
            ➤ Output Type : R
            ➤ Method Signature : R apply(double value)
            
            
      ➤ 1.1.2. Primitive Output Functions : Takes one generic input (T) and produce primitive output.
      
         ➤ Input Type : T
         ➤ Output Type : primitive
         ➤ Method Signature : <<primitive>> <<methodName>>(T value)
         
         ➤ 1.1.2.1. ToIntFunction<T> : Takes one generic input (T) and produce int (primitive) output.

            ➤ Input Type : T
            ➤ Output Type : int (primitive)
            ➤ Method Signature : int applyAsInt(T value)
         
         ➤ 1.1.2.2. ToLongFunction<T> : Takes one generic input (T) and produce long (primitive) output.

            ➤ Input Type : T
            ➤ Output Type : long (primitive)
            ➤ Method Signature : long applyAsLong(T value)
            
         ➤ 1.1.2.3. ToDoubleFunction<T> : Takes one generic input (T) and produce double (primitive) output.

            ➤ Input Type : T
            ➤ Output Type : double (primitive)
            ➤ Method Signature : double applyAsDouble(T value)
            
            
      ➤ 1.1.3. Primitive type conversion functions : Takes one primitive type and produce different type of primitive.
   
         ➤ Input Types : primitive
         ➤ Output Type : primitive
         ➤ Method Signature : <<primitive>> <<methodName>>(<<primitive>> value)
      
         ➤ 1.1.3.1. IntToLongFunction : Takes int (primitive) input and produce long (primitive) output.
         
            ➤ Input Types : int (primitive)
            ➤ Output Type : long (primitive)
            ➤ Method Signature : long applyAsLong(int value)
            
         ➤ 1.1.3.2. IntToDoubleFunction : Takes int (primitive) input and produce double (primitive) output.
         
            ➤ Input Types : int (primitive)
            ➤ Output Type : double (primitive)
            ➤ Method Signature : double applyAsDouble(int value)
            
         ➤ 1.1.3.3. DoubleToIntFunction : Takes double (primitive) input and produce int (primitive) output.
         
            ➤ Input Types : double (primitive)
            ➤ Output Type : int (primitive)
            ➤ Method Signature : int applyAsInt(double value)
            
         ➤ 1.1.3.4. DoubleToLongFunction : Takes double (primitive) input and produce long (primitive) output.
         
            ➤ Input Types : double (primitive)
            ➤ Output Type : long (primitive)
            ➤ Method Signature : long applyAsLong(double value)
            
         ➤ 1.1.3.5. LongToIntFunction : Takes long (primitive) input and produce int (primitive) output.
         
            ➤ Input Types : long (primitive)
            ➤ Output Type : int (primitive)
            ➤ Method Signature : int applyAsInt(long value)
            
         ➤ 1.1.3.6. LongToDoubleFunction : Takes long (primitive) input and produce double (primitive) output.
         
            ➤ Input Types : long (primitive)
            ➤ Output Type : double (primitive)
            ➤ Method Signature : double applyAsDouble(long value)
   
   
   ➤ 1.2. BiFunction<T,U,R> : Takes two generic inputs (T,U) and produce generic output (R).

      ➤ Input Types : T,U
      ➤ Output Type : R
      ➤ Method Signature : R apply(T t, U u)
   
   
      ➤ 1.2.A. BinaryOperator<T> extends BiFunction<T,T,T> : Takes two same type of generic inputs (T,T) and produce same type of generic output (T).
      
         ➤ Input Types : T,T
         ➤ Output Type : T
         ➤ Method Signature : T apply(T t1, T t2)
         
         ➤ 1.2.A.1. BinaryOperator variants for primitive tyeps : Takes two primitive inputs and produce same type of primitive output.
         
            ➤ Input Type : iprimitive, primitive
            ➤ Output Type : primitive
            ➤ Method Signature : <<primitive>> <<methodName>>(<<primitive>> value)
         
            ➤ 1.2.A.1.1. IntBinaryOperator : Takes two int (primitive) input and produce int (primitive) output.
            
               ➤ Input Type : int (primitive), int (primitive)
               ➤ Output Type : int (primitive)
               ➤ Method Signature : int applyAsInt(int value)

            ➤ 1.2.A.1.2. LongBinaryOperator : Takes two long (primitive) input and produce long (primitive) output.
            
               ➤ Input Type : long (primitive), long (primitive)
               ➤ Output Type : long (primitive)
               ➤ Method Signature : long applyAsLong(long value)

            ➤ 1.2.A.1.3. DoubleBinaryOperator : Takes two double (primitive) input and produce double (primitive) output.
            
               ➤ Input Type : double (primitive), double (primitive)
               ➤ Output Type : double (primitive)
               ➤ Method Signature : double applyAsDouble(double value)
         
         
      ➤ 1.2.1. Primitive Output BiFunctions : Takes one generic inputs (T,U) and produce primitive output.
      
         ➤ Input Types : T, U
         ➤ Output Type : primitive
         ➤ Method Signature : <<primitive>> <<methodName>>(T t, U v)
      
         ➤ 1.2.1.1. ToIntBiFunction<T> : Takes two generic input (T,U) and produce int (primitive) output.

            ➤ Input Types : T, U
            ➤ Output Type : int (primitive)
            ➤ Method Signature : int applyAsInt(T t, U v)
         
         ➤ 1.2.1.2. ToLongBiFunction<T> : Takes one generic input (T) and produce long (primitive) output.

            ➤ Input Types : T, U
            ➤ Output Type : long (primitive)
            ➤ Method Signature : long applyAsLong(T t, U v)
            
         ➤ 1.2.1.3. ToDoubleBiFunction<T> : Takes one generic input (T) and produce double (primitive) output.

            ➤ Input Types : T, U
            ➤ Output Type : double (primitive)
            ➤ Method Signature : double applyAsDouble(T t, U v)
            
            
➤ 2. Predicate : Test something and produce boolean (true or false) output

   ➤ 2.1. Predicate<T> : Takes one generic input (T) and produce boolean output.

      ➤ Input Type : T
      ➤ Output Type : boolean
      ➤ Method Signature : boolean test(T t)
      
      ➤ 2.1.1. Primitive Input Predicates : Takes one primitive input and produce boolean output.
      
         ➤ Input Type : primitive
         ➤ Output Type : boolean
         ➤ Method Signature : boolean test(<<primitive>> value)
         
         ➤ 2.1.1.1. IntPredicate : Takes one int (primitive) input and produce boolean output.
         
            ➤ Input Type : int (primitive)
            ➤ Output Type : boolean
            ➤ Method Signature : boolean test(int value)
         
         ➤ 2.1.1.2. LongPredicate : Takes one long (primitive) input and produce boolean output.
         
            ➤ Input Type : long (primitive)
            ➤ Output Type : boolean
            ➤ Method Signature : boolean test(long value)
            
         ➤ 2.1.1.3. DoublePredicate : Takes one double (primitive) input and produce boolean output.
         
            ➤ Input Type : double (primitive)
            ➤ Output Type : boolean
            ➤ Method Signature : boolean test(double value)
      
      
   ➤ 2.2. BiPredicate<T,U> : Takes two generic inputs (T,U) and produce boolean output.

      ➤ Input Types : T, U
      ➤ Output Type : boolean
      ➤ Method Signature : boolean test(T t, U u)
      
      
➤ 3. Consumer : Takes some input without returning anything (void).

   ➤ 3.1. Consumer<T> : Takes one generic input (T) and return nothing(void).

      ➤ Input Type : T
      ➤ Output Type : void
      ➤ Method Signature : void accept(T t)
      
      ➤ 3.1.1. Primitive Input Consumer : Takes one primitive input and return nothing(void).
      
         ➤ Input Type : primitive
         ➤ Output Type : void
         ➤ Method Signature : void accept(<<primitive>> value)
         
         ➤ 3.1.1.1. IntConsumer : Takes one int (primitive) input and return nothing(void).
         
            ➤ Input Type : int (primitive)
            ➤ Output Type : void
            ➤ Method Signature : void accept(int value)
         
         ➤ 3.1.1.2. LongConsumer : Takes one long (primitive) input and return nothing(void).
         
            ➤ Input Type : long (primitive)
            ➤ Output Type : void
            ➤ Method Signature : void accept(long value)
            
         ➤ 3.1.1.3. DoubleConsumer : Takes one double (primitive) input and return nothing(void).
         
            ➤ Input Type : double (primitive)
            ➤ Output Type : void
            ➤ Method Signature : void accept(double value)
            
            
   ➤ 3.2. BiConsumer<T,U> : Takes two generic inputs (T, U) and return nothing(void).

      ➤ Input Types : T, U
      ➤ Output Type : void
      ➤ Method Signature : void accept(T t, U u)
      
      
   ➤ 3.3. Generic with primitive Consumer : Takes one generic (T) and second primitive as inputs and return nothing(void).

      ➤ Input Types : T, primitive
      ➤ Output Type : void
      ➤ Method Signature : void accept(T t, <<primitive>> value)
      
      ➤ 3.3.1. ObjIntConsumer<T> : Takes one generic (T) and second int (primitive) as inputs and return nothing(void).
      
         ➤ Input Types : T, int
         ➤ Output Type : void
         ➤ Method Signature : void accept(T t, int value)
         
      ➤ 3.3.2. ObjLongConsumer<T> : Takes one generic (T) and second long (primitive) as inputs and return nothing(void).
      
         ➤ Input Types : T, long
         ➤ Output Type : void
         ➤ Method Signature : void accept(T t, long value)
         
      ➤ 3.3.3. ObjDoubleConsumer<T> : Takes one generic (T) and second double (primitive) as inputs and return nothing(void).
      
         ➤ Input Types : T, double
         ➤ Output Type : void
         ➤ Method Signature : void accept(T t, double value)
         
         
➤ 4. Supplier : Takes nothing as input and produce the output value.

   ➤ 4.1. Supplier<T> : Takes nothing as input and produce generic output value (T).

      ➤ Input Type : nothing
      ➤ Output Type : T
      ➤ Method Signature : T get()

   ➤ 4.2. Primitive Supplier : Takes nothing as input and produce primitive output value.

      ➤ Input Type : nothing
      ➤ Output Type : primitive
      ➤ Method Signature : <<primitive>> <<methodName>>()
      
      ➤ 4.2.1. IntSupplier : Takes nothing as input and produce int (primitive) output value.

         ➤ Input Type : nothing
         ➤ Output Type : int
         ➤ Method Signature : int getAsInt()
         
      ➤ 4.2.2. LongSupplier : Takes nothing as input and produce long (primitive) output value.

         ➤ Input Type : nothing
         ➤ Output Type : long
         ➤ Method Signature : long getAsLong()
         
      ➤ 4.2.3. DoubleSupplier : Takes nothing as input and produce double (primitive) output value.

         ➤ Input Type : nothing
         ➤ Output Type : double
         ➤ Method Signature : double getAsDouble()
         
      ➤ 4.2.4. BooleanSupplier : Takes nothing as input and produce boolean (primitive) output value.

         ➤ Input Type : nothing
         ➤ Output Type : boolean
         ➤ Method Signature : boolean getAsBoolean()

Friday, 3 July 2015

Memory types and Garbage Collector

➟ Purpose

      The main purpose of this article is to understand the structure of heap memory and how Garbage Collector works with it.

➟ Logical Structure of Memory (Image Source)


➟ Heap Memory

• The heap is the memory where all your objects will be stored. • The heap is created when the JVM starts up and may increase or decrease in size while the application runs.
• When the heap becomes full, garbage is collected. • We can define initial heap size using -Xms and maximum heap size using -Xmx.

➟ Areas (or Generations)

➤ New/Young/Nursery Generation(Space)

  • It's logical part of heap memory which is reserved for allocation of new objects.
  • When it becomes full, garbage is collected by running a special "young collection".
  • It can be define using -Xmn=512M

    ➤ Survivor1(From)

      • It's logical part of Young memory.
      • If object live after some fix amount of GC cycles, it will be move here from Eden space while performing Minor GC.

    ➤ Survivor2(From)

      • It's logical part of Young memory.
      • If object live after some fix amount of GC cycles, it will be move here from Survivor2 while performing Minor GC.

  • We can define the ratio between Eden space and survivor space using -XX:SurvivorRatio. For example if Young Generation size is 12m and VM switch is -XX:SurvivorRatio=2 then 6m will be reserved for Eden Space and 3m each for both the Survivor spaces. The default value is 8.

➤ Old/Tenured Generation(Space)

  • Object will be moved/promoted here when they are long live objects.
  • Object will be moved here while Major GC cycle.
  • The size of this space can be calculated as : Total Heap size - -Xmn (used for Old space).
  • We can also define ratio between old space and new space using -XX:NewRatio. for example, -XX:NewRatio=3 which is equivalent to Young:Tenured <=> 1:3 ratio.

➤ Perm Gen (The Permanent Generation) (before jdk 1.8)

  • It consists mostly of class declarations loaded and stored into it.
  • It stores Class and Methods' metadata like the name and fields of the class, methods with the method bytecode.
  • It stores Constant Pool information, object arrays and type arrays associated with a class and Just In Time compiler optimizations.
  • It stores String Pool information before jdk 7.
  • It can be specified using -XX:PermSize=256m (initial size) and -XX:MaxPermSize=356m

➟ Some Definitions/Terminologies

Major GC : Major GC is cleaning the Old/Tenured space.
Minor GC : Major GC is cleaning the Young(Eden and Survivor spaces) space.
Full GC : Full GC is cleaning the entire Heap – both Young and Old/Tenured spaces.
Application Pauses : While running GC, some application threads will pause, it's called Application Pauses.

➟ Java 8 Updates

➤ PermGen bybye..!, Welcome MetaSpace :)

  • The metadata has now moved to native memory to an area known as the “Metaspace”.
  • No longer have the PermGen, is not gone, so no more java.lang.OutOfMemoryError: PermGen space.
  • Similarly Metaspace introduced, so from now java.lang.OutOfMemoryError: Metaspace will be there, but it will be rare as Metaspace increase dynamically.
  • PermGen related JVM options will be just ignored
  • MetaSpace increases dynamically as needed, however MaxMetaspaceSize is available in case we want to limit it.
  • Slow compare to PermGen. (obviously, to get something, always need to pay something..!!)
  • More details : Reference

Error messages related to Memory Exhausted ( Garbage Collector ) in Java

➟ Purpose

      The main purpose of this article is to understand the root cause behind different kind of error messages we generally face while our day to day coding life. Here, I am going to clear some important and most seen error messages.

➟ Class Hierarchy for Error

➟ Some Examples

➤ java.lang.OutOfMemoryError: GC Overhead limit exceeded

• It does not indicate that heap space memory is 100% full, but it's very small.
• If more than 98% of the total time is spent in garbage collection and less than 2% of the heap is recovered, then this kind of error is thrown.
• This feature is designed to prevent applications from running for an extended period of time while making little or no progress because the heap is too small.
• It can be disable using -XX:-UseGCOverheadLimit

➤ java.lang.OutOfMemoryError: Requested array size exceeds VM limit

• The application (or APIs used by that application) attempted to allocate an array that is larger than the heap size.
• For example, if an application attempts to allocate an array of 512 MB but the maximum heap size is 256 MB.

➤ java.lang.OutOfMemoryError: Java heap space

• Heap space memory is 100% full or it is less than required for allocating to new object.
• This error does not necessarily always imply a memory leak, but it can be.
• The problem can be as simple as a configuration issue, where the specified heap size (or the default size, if it is not specified) is insufficient for the application.

➤ java.lang.OutOfMemoryError: PermGen space

• It indicates the perm gen memory (subpart of heap) is full.
• It indicates it's not able to store more class or method metadata.

• It will be no more thrown while using JDK 8.

➤ java.lang.OutOfMemoryError: Metaspace

• It indicates the native memory (referred to here as metaspace) is full.
• It indicates it's not able to store more class or method metadata.
• It can be thrown while using JDK 8.

➤ java.lang.StackOverflowError

• It indicates the perm gen memory (subpart of heap) is full.
• It indicates it's not able to store more class or method metadata.


How String matters to Garbage Collection and Memory Leak in Java?

➟ What is Memory Leak?

      The application is unintentionally holding references to objects, and this prevents the objects from being garbage collected. This is the Java language equivalent of a memory leak.

➟ What is String Pool?

      String pool (String intern pool) is a special storage area in Java heap. When a string is created and if the string already exists in the pool, the reference of the existing string will be returned, instead of creating a new object and returning its reference.

➤ Some Examples

• Both below are same. It will create new instance only if it is not available in pool, and then add in pool.
String s1 = "Vishal"; 
String s2 = new String("Vishal").intern();

• Below line will create new instance each time.
String s3 = new String("Vishal");

➟ String.substring Method

➤ Before JDK 7 update 6

• String was using counter, offset variable for managing the operations like Substring.
• String was sharing same char[] of original String while calling substring method, thus original String was not eligible for GC.
• Substring method was fast compare to new version.

➤ After JDK 7 update 6

• Counter and offset variables has been removed from String class.
• String is not sharing char[] of original String while calling substring method.
• Substring method is slow compare to old version, because it will create new char[] for each call of substring.

➟ Changes done for String.substring method update in JDK 7u6

➟ Memory Leak Bug Example in before JDK 7u6 (Source)

public class TestGC {
    private String largeString = new String(new byte[100000]);
    
    String getSmallString() {
// if caller stores this substring, this object will not be gc'ed
        return this.largeString.substring(0,2);
//      return new String(this.largeString.substring(0,2)); // no error here!
    }
    
    public static void main(String[] args) {
        java.util.ArrayList list = new java.util.ArrayList();
        for (int i = 0; i < 1000000; i++) {
            TestGC gc = new TestGC();
            list.add(gc.getSmallString());
        }
    }
}
➟ Java 8 Update

➤ String Deduplication :

• A new optimization has been made that enables the G1 collector to identify strings which are duplicated more than once across your heap.
• It will handle it by pointing into the same internal char[] array.
• It will avoid multiple copies of the same string from residing inefficiently within the heap.

Garbage Collector in Java

     
Garbage Collector is very vast topic, but I am going to cover only here what every Java Developer must know.

What is Garbage Collection?

• Garbage Collection is a process in java which is carried by a daemon thread called “Garbage Collector (GC).”
• Garbage Collector will call finalize method of object before removing it from memory. Thus it will allow us to enable clean up processing.
• We can't force Garbage Collector to run it at the moment, but we can just request it using System.gc() or Runtime.gc().
• Garbage collector types are defined based on how it works rather than which type of memory it collects.
• All types of collectors can collect the all the types of memory.
• There are four types of garbage collectors available in JVM, each of them have its own unique advantages and disadvantages. The choice of which one to use isn’t automatic and lies on your shoulders and the it depends on differences in throughput and application pauses.

Types of Garbage Collectors

1. The Serial Collector

• Designed for single-threaded environments (e.g. 32 bit or Windows) and for small heaps.
• It freezes all application threads whenever it’s working. (Application Pauses)
• It uses just a single thread for garbage collection.
• Almost outdated now.

2. The Parallel/Throughput Collector

• Designed for multi-threaded environments.
• It also freezes all application threads whenever it’s working. (Application Pauses)
• Uses multiple threads for garbage collection.
• It is the JVM’s default collector.

3. The CMS(Concurrent Mark Sweep) Garbage Collector

• Designed for multi-threaded environments.
• It will freezes all application threads, in two scenarios only.
  ➤ While marking the referenced objects in the tenured/old generation space
  ➤ If there is a change in heap memory in parallel while doing the garbage collection.
• It uses multiple threads (“concurrent”) to scan through the heap (“mark”) for unused objects that can be recycled (“sweep”).
• It ensure better application throughput.
• It's not by default Collector used by JVM.
• It uses more CPU in compare to the Parallel Collector.
• Race condition occurs between collecting the young and old generations.
• If you are willing to allocate more CPU resources (multicore processors) to avoid application pauses this is the collector you’ll probably want to use.
• It's suitable when your heap is less than 4Gb in size.

4. The G1 (Garbage First) collector

• The Garbage first collector (G1) introduced in JDK 7 update 4.
• The collector splits the heap up into fixed-size regions and tracks the live data in those regions (spanning from 1MB to 32MB (depending on the size of your heap)).
• The G1 collector utilizes multiple background threads to scan through the heap (which divided into regions).
• When a GC is deemed necessary, it collects the regions with less live data first (hence, "garbage first").
• It's suitable when your heap is greater than 4Gb in size.

How to apply?

• Serial generational collector ➤ -XX:+UseSerialGC
• Parallel for young space, Serial for old space generational collector ➤ -XX:+UseParallelGC
• Parallel for young and old both spaces generational collector ➤ -XX:+UseParallelOldGC
• Concurrent mark sweep with serial young space collector ➤ -XX:+UseConcMarkSweepGC –XX:-UseParNewGC
• Concurrent mark sweep with parallel young space collector ➤ -XX:+UseConcMarkSweepGC –XX:+UseParNewGC
• G1 garbage collector ➤ -XX:+UseG1GC

Wednesday, 1 July 2015

Heap vs Stack Memory Java

Stack Memory Heap Memory
What? It's type of temporary memory used by JVM to store local method primitives variables, and method calls information. It's type of memory used by JVM to store references of objects (regardless where they are created) and String Pool.
Size? Small, It's very less compare to Heap. Big, It's very more compare to Heap.
Scope? Single Thread Multiple Threads
Shared? No, It is not shared between multiple threads. Each thread will have it's own stack memory. Yes, It is shared between multiple threads, so each thread can get reference of any object.
Example? Infinite Recursion :
public static void test(long a,long b){
   test(a++,b++);
}
Adding Infinite String in List/Set.
public static void test(){
      List list = new ArrayList();
      while(true){
          list.add(new String("Test"));
      }
}
Notification of Exceed Memory JVM will throw StackOverflowError JVM will throw OutOfMemoryError
Access Spped? Fast, Single thread will access it, so obviously it can be access more faster compare to Heap. Slow, Multiple thread will access it, so obviously it can be access slower compare to Stack.
How to Apply? JVM Option -Xss=10M, It's vary from version to version. by default 128KB for windows 64 bit. Oracle Docs JVM Option -Xms=512M (Initial Java heap size) and -Xmx=1024M (Maximum Java heap size)
How to Avoid? Try to avoid recursive code as much as possible. Recursion code can be always tranform into Interative.

Why? : Recursion vs Iteration
How? : Binary Search Alorithm
Make sure that any objects have not live/strong references behind your eyes which leads to Memory Leak.

Avoid open Streams, close them. (mostly with IO)
Avoid open connections, close them. (mostly with database operations)
Avoid new String(String s), alternative use new String().intern()
Garbage collected? No, Once a function call runs to completion, any data on the stack created specifically for that function call will automatically be deleted. Yes, Once all references for any object are null, it will be collected by GC which is run by JVM.
Common Points? Stack and Heap both are stored in the computer's RAM.

Wednesday, 10 September 2014

Lucene Indexing and Searching with MySQL data

        While working with my recent project I need to work with Lucene indexing. I tried Google, but I was not able to find any example with Lucene API latest version (i.e. 4.10.0). So here I am giving very simple example for indexing and then searching the particular data using Lucene API.

➟ About the Example

     I am giving brief explanation here about this example. This example will retrieve some information from database using simple JDBC connection. After that it will index that data and we can search indexed data very fast using Lucene API.

➟ Pre-requirements

    To run this example successfully you need to manage these requirements.

     ➤ Any SQL Database
  
         You can any driver name according to database. I have used MySQL for this example. Create one database named solr_test and one table named student_details with fields id INT, name varchar(10), address varchar(50) and details varchar(500).

     Maven
 
        You can see about it This is maven based project. So to run it successfully you need to configure any Java IDE with maven plugin or maven must installed externally


➟ Download demo

➟ Code Snap

LceneTest.java.js


package com.lucene.test;

import java.io.File;
import java.sql.Connection;
import java.sql.DriverManager;
import java.sql.ResultSet;
import java.sql.Statement;

import org.apache.lucene.analysis.Analyzer;
import org.apache.lucene.analysis.core.KeywordAnalyzer;
import org.apache.lucene.document.Document;
import org.apache.lucene.document.Field;
import org.apache.lucene.document.FieldType;
import org.apache.lucene.document.IntField;
import org.apache.lucene.document.StringField;
import org.apache.lucene.index.DirectoryReader;
import org.apache.lucene.index.IndexReader;
import org.apache.lucene.index.IndexWriter;
import org.apache.lucene.index.IndexWriterConfig;
import org.apache.lucene.index.IndexWriterConfig.OpenMode;
import org.apache.lucene.queryparser.classic.MultiFieldQueryParser;
import org.apache.lucene.search.IndexSearcher;
import org.apache.lucene.search.Query;
import org.apache.lucene.search.TopDocs;
import org.apache.lucene.store.Directory;
import org.apache.lucene.store.FSDirectory;
import org.apache.lucene.util.Version;

/**
 * This is test example file to explore Lucene API
 * 
 * @author vishal.zanzrukia
 * @version 1.0
 */
public class LuceneTest
{
 /**
  * this is index directory path where all index file will be stored which lucene uses internally.
  */
 public static final File INDEX_DIRECTORY = new File("IndexDirectory");

 /**
  * to create index on simple database table
  */
 public void createIndex()
 {

  System.out.println("-- Indexing --");

  try
  {
   /** JDBC Section */
   Class.forName("com.mysql.jdbc.Driver").newInstance();

   /** Assuming database solr_test exists */
   Connection conn = DriverManager.getConnection("jdbc:mysql://localhost:3306/solr_test", "root", "P@ssw0rd@123");
   Statement stmt = conn.createStatement();
   String sql = "select id,name,address,details from student_details";
   ResultSet rs = stmt.executeQuery(sql);

   /** Lucene Section */
   Directory directory = FSDirectory.open(INDEX_DIRECTORY);

   /** defining Analyzer */
   Analyzer keywordAnalyzer = new KeywordAnalyzer();

   /** preparing config for indexWriter */
   IndexWriterConfig writerConfig = new IndexWriterConfig(Version.LATEST, keywordAnalyzer);
   /** Create a new index in the directory, removing any previously indexed documents */
   writerConfig.setOpenMode(OpenMode.CREATE);
   /**
    * Optional: for better indexing performance, if you are indexing many documents,
* increase the RAM buffer. But if you do this, increase the max heap size to the JVM (eg add -Xmx512m or -Xmx1g): */ // writerConfig.setRAMBufferSizeMB(256.0); IndexWriter iWriter = new IndexWriter(directory, writerConfig); int count = 0; Document doc = null; Field field = null; /** declaring string type */ FieldType stringType = new FieldType(); stringType.setTokenized(true); stringType.setIndexed(true); /** Looping through resultset and adding data to index file */ while (rs.next()) { doc = new Document(); /** adding id in document */ field = new IntField("id", rs.getInt("id"), Field.Store.YES); doc.add(field); /** adding name in document */ field = new StringField("name", rs.getString("name"), Field.Store.YES); doc.add(field); /** adding address in document */ field = new StringField("address", rs.getString("address"), Field.Store.YES); doc.add(field); /** adding details in document */ field = new StringField("details", rs.getString("details"), Field.Store.YES); doc.add(field); /** Adding doc to iWriter */ iWriter.addDocument(doc); count++; } System.out.println(count + " record indexed"); /** Closing iWriter */ iWriter.commit(); iWriter.close(); /** Closing JDBC connection */ rs.close(); stmt.close(); conn.close(); } catch (Exception e) { e.printStackTrace(); } } /** * to search the keywords * * @param keyword */ public void search(String keyword) { System.out.println("-- Seaching --"); try { /** Searching */ IndexReader directoryReader = DirectoryReader.open(FSDirectory.open(INDEX_DIRECTORY)); IndexSearcher searcher = new IndexSearcher(directoryReader); Analyzer keywordAnalyzer = new KeywordAnalyzer(); /** MultiFieldQueryParser is used to search multiple fields */ String[] filesToSearch = { "id", "name", "address", "details" }; MultiFieldQueryParser mqp = new MultiFieldQueryParser(filesToSearch, keywordAnalyzer); /** search the given keyword */ Query query = mqp.parse(keyword); System.out.println("query >> " + query); /** run the query */ TopDocs hits = searcher.search(query, 100); System.out.println("Results found >> " + hits.totalHits); Document doc = null; for (int i = 0; i < hits.totalHits; i++) { /** get the next document */ doc = searcher.doc(hits.scoreDocs[i].doc); System.out.println("==========" + (i + 1) + " : Start Record=========\nId :: " + doc.get("id") + "\nName :: " + doc.get("name") + "\nDetails :: " + doc.get("details") + "\n==========End Record=========\n"); } } catch (Exception e) { e.printStackTrace(); } } /** * main method to check the output * * @param args */ public static void main(String[] args) { LuceneTest obj = new LuceneTest(); /** creating index */ obj.createIndex(); /** searching simple keyword */ System.out.println("==================searching simple keyword==========================="); obj.search("vishal"); /** searching using wild card */ System.out.println("==================searching using wild card==========================="); obj.search("neh*"); /** searching using logical OR operator */ System.out.println("==================searching using logical OR operator==========================="); obj.search("vishal OR neha"); /** searching using logical AND operator */ System.out.println("==================searching using logical AND operator==========================="); obj.search("vishal AND neha"); } }

Tuesday, 31 December 2013

Layout Example with ExtJS MVC

       Here I am giving very simple but one step complex example compared to my last post hello world example. By reading/understanding this example you can learn real usage of layouts in ExtJS. I am trying to go one by one step for learning ExtJS. Please feel free to give any suggestions if you want to learn about ExtJS.

➟ About the Example

     I am giving brief explanation here about this example. Through this example, I want to provide some layout explanation (H-Box, V-Box, Border etc.) which are very popular and will frequently use in your Web Development. Along with this I also want to provide how to make server/remote call from ExtJS to fetch data. I used here Java-Servlet for fetching data but you can use do server/web-service call for this. I am listing some files in a simple grid which is coming from a server (here apache-tomcat). So here I am trying to integrate Java-EE with ExtJS UI.

➟ Pre-requirements

    To run this example successfully you need to manage these requirements.

     ➤ ExtJS library
  
         You can see about it here.

     Apache-tomcat
 
        You can see about it here.

    ➤ JSON Library for Java
 
        You can see about it here.


➟ Download demo

➟ Snaps

Thursday, 12 December 2013

Hello World with ExtJS MVC


In my last post we had seen first example with Ext JS, but now think a real senario of big application in which you have so many components, and there will be use multiple time as well. If we code in one page as we did in our last example in complex/big application, it is very hard to manage code. So ExtJS is providing MVC architecture for developing your application. Here I am giving a very small example in MVC with introduction. Before I go with the example I am trying to give some introduction about some ExtJS classes which are very necessary and important and frequently used while developing with ExtJS.

→ Ext.data.Model

    The model describes some objects which will use in your application. If you are familiar with Java, then you should know about Bean/Pojo classes. This object is very similar to it, but in ExtJS..! So basically this object contains an array of fields.

→ Ext.data.Store

   The store is client side storage (of records/data) of the model. We just have to provide a url for getting data to store using proxies as given in below example.

→ Ext.app.Controller

   Controllers are the handlers/functions of events which will fire dynamically in your application. There are basically listeners of ExtJS components. For example click method of button, mouseover method of hyperlink.

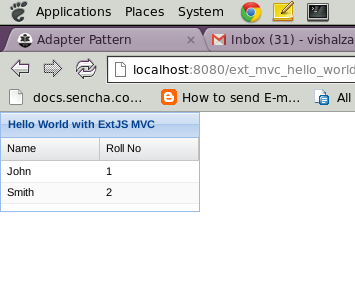
   Now I am giving here snaps of my code.

→ DemoController.js
Ext.define('MyApp.controller.DemoController', {
 extend:'Ext.app.Controller',
 init:function() {
  /**
   * We will handle all events of components in init method of controller.
   * */ 
  this.control({
   /**
    * you can see usage control method over here.
    * http://docs.sencha.com/extjs/4.2.2/#!/api/Ext.app.Controller-method-control.
    **/ 
   'DemoGrid':{
    'itemclick':function(grid, record, item, index, e, eOpts){
     alert('You clicked row with index : '+index);
    }
   }
  });
 }
});

→ DemoModel.js
Ext.define('MyApp.model.DemoModel', {
 extend : 'Ext.data.Model',
 /**
  * Here there will be fields array. 
  **/
 fields : [{
  name : 'name', //this property will indicate your data field property   
  mapping : 'name' //this property will indicate dataIdex in grid.
 },{
  name : 'rollNo',
  mapping : 'rollNo'
 }]
});

→ DemoStore.js
Ext.define('MyApp.store.DemoStore', {
    extend: 'Ext.data.Store',
    model: 'MyApp.model.DemoModel',
    //it will load your store on start up automatically.
 autoLoad : true,
    proxy: {
        type: 'ajax',
        //url of your data. this may be from your server in your real application.
  url : 'data/demoData.json',
        reader: {
         //type of data..ExtJS also support xml format.
            type: 'json',
            root: 'data'
        }
    }
});

→ DemoGrid.js
Ext.define('MyApp.view.DemoGrid',{
 extend:'Ext.grid.Panel',
 alias:'widget.DemoGrid',
 initComponent:function()
 {
  this.store='MyApp.store.DemoStore';
  this.title='Hello World with ExtJS MVC';  
  this.border=true;
  this.width=200;
  this.height=100;
  this.columns=[{
   text:'Name',
   dataIndex:'name',//this property will map with your model which used in store.
   flex:1
  },{
   text:'Roll No',
   dataIndex:'rollNo',
   flex:1
  }];
  this.callParent(arguments);
 }
});

→ Viewport.js
Ext.define('MyApp.view.Viewport', {
 extend : 'Ext.container.Viewport',
 requires : ['MyApp.view.DemoGrid'],
 initComponent:function(){
      
   this.items = [{
    xtype:'DemoGrid'
   }];
   
      this.callParent(arguments);
 }
});

→ init.js
Ext.application({
 name:'MyApp',
 appFolder:'com',
 autoCreateViewport : true,
 modals:['MyApp.model.DemoModel'],
 stores:['MyApp.store.DemoStore'],
 controllers:['DemoController'], 
 launch : function(){
  alert('Your first application launched with ExtJS MVC..!'); 
        }
});

→ Folder Strcture


→ Download demo

→ Snaps


Friday, 22 November 2013

Hello world with ExtJS

    If you didn't download ExtJS library still, please read this. I am trying to give here a very small example in Ext JS. In this example there is one simple form with three fields. I am giving some important explanation about basic and necessary functions or objects of Ext JS.
Ext.onReady
   
    This is the same function like document.onload event in simple HTML. It will call once your html page is loaded. So if we are not following any MVC architecture while developing application using Ext JS, we have to write everything in this function, otherwise it may happen that in which div/body you are trying to render your Ext JS component, it's not rendered on the page.

→ Ext.create

    Whenever you will create a new object (already defined) of any Ext JS component, we will use this function. This function takes two parameters. 1. Full name of the component which you are trying to create as per given by sencha. 2. Parameters or configurations object.

    So now I am giving you my code snap as given below. I hope this will useful for Ext beginner..!!


 Hello World


→ Download demo, Live example


→ Snaps

Hello World with Ext JS

Wednesday, 20 November 2013

Why Ext JS? What Ext JS? How Ext JS?


1. Why ExtJS?

     
      I will explain here in short why should we use Ext JS in your web application.


→ No Need to Worry about HTML Code

     While developing Web Application with ExtJS you do not worry about HTML tags. You can develop a whole application without knowledge of single <form> tag. Of course if you are aware of html tags, it's better for customize components in ExtJS. We will see later how to customize components in ExtJS.


→ Scalability - Code Reuse

   If you are developing big or small application Code re-usability will always take much less efforts in developing. ExtJS is supporting it in a very structured way and also easily from learning point of view.    


→ Very easy to Customize 

  ExtJS is giving very logically file separation and folder structure according to what is the purpose of that file/folder. So we can easily find a particular file for particular component and customize that.

→ Benefit of HTML5 Without know What is it

   You can develop your whole web application by taking all benefits of HTML5 without knowing any attributes of any components in HTML5, because ExtJS 4 internally use and support HTML5.

→ MVC Architecture 

    MVC (model, view, controller) is most widely used Architecture in Web Development at server side as well as client side. So we are talking about here is client side. ExtJS supports MVC architecture in client side development, so it's very easy to maintain your code while developing large applications. We will see shortly in next posts how to setup and start your application with ExtJS MVC.

→ Multiple platforms with No plugin

    This is a very big benefit of ExtJS that it is platform independent for run application. That means no browser plugins need to be installed. You can run your web application on android as well iPhone.

→ Thousands of Ready components

   There are lots of ready components and layout examples available in Sencha docs which we can use directly and also well documented each of them. We will see how to use it.

→ Very good Chart Library

   This is my personal experience that "to integrate charts" in a web application is sometimes headache or confusion that which library to use for that. ExtJS provides us very good and rich charting library purely in JS (JavaScript), so there is no dependency of flash and it will display in any device running on android or Ios. And also as we discussed before in customization topic charts is also very customizable.

→ Maximum utilization of Browser memory

   Every browser provides some local storage memory for saving your current web page data. You can test it here. In simple application (without using any framework) most of the developers are not utilizing that memory, actually we can reuse data which loaded once. ExtJS supports "Store" mechanism for this. We will see how can we achieve this by using ExtJS.

→ Browser Compatibility 

    Ext JS 4 supports all major web browsers, from Internet Explorer 6 to the latest version of Google Chrome. During development, however, we recommend that you choose one of the following browsers for the best debugging experience:

   > Google Chrome 10+
   > Apple Safari 5+
   > Mozilla Firefox 4+ with the Firebug Web Development Plugin


→ Easy to Learn

   There is very good documentation given here and of course I am trying to provide my best here regarding ExtJS..! So it's very easy to use in your web applications.

→ Rapid Development

  By using ready ExtJS components your development process will be very fast.

→ Large Community

   You will get a large number of users who will help you, so take a look here and start to learn and enjoy..!

→ Ready Plugins

   You will get numbers of ready plugins in ExtJS. I am giving you one example here. But we will see how to make our own plugins shortly. 


2. What ExtJS?

      
     ExtJS is a pure JavaScript framework to develop your web applications by taking advantages of DOM scripting, Ajax call, DHTML and many Util functions provided by it. ExtJS can integrate with any backend technology or framework or language like Java, PHP. I will see integration with Java.


3. How ExtJS?

     Before you start developing with ExtJS you have to download library form here. There is a community version available over there. After download just start Hello World with ExtJS and enjoy..!